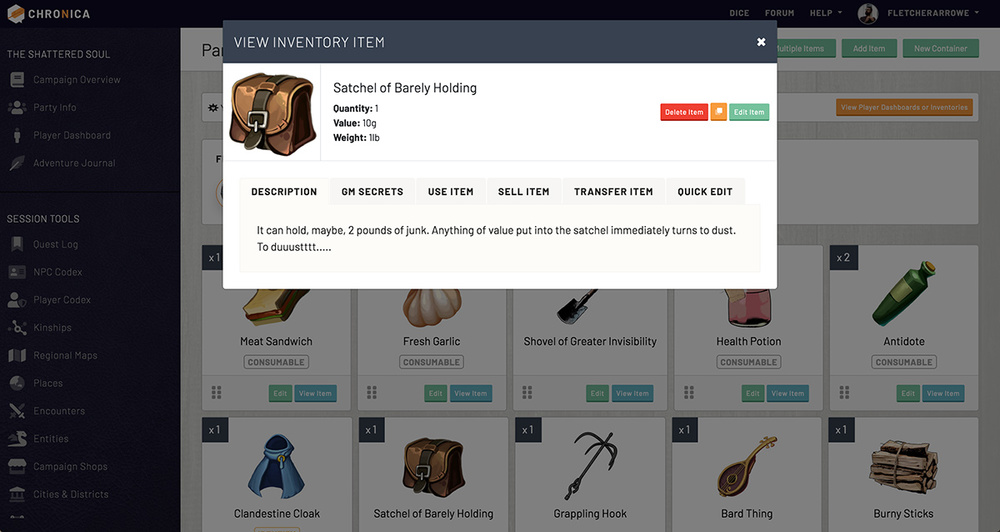
We make inventory and item tracking quick and easy! There are various components involved in inventories, read more in-depth about each of them in the sub-guides below.
Party and Player inventories function the same way. The main inventory screen will show all of your items and containers. Any items not in a container will appear at the top, with the containers (and items within) ordered below them. If you have multiple character inventories or containers created, you will see an extra panel at the top titled "Your Inventories". You can access your other character inventories by clicking their name in this box.
To filter the current inventory by container, click any of the container buttons under "Filter By Container" to view only those items.
Game Master View
If you are a GM, you will see an extra button in this top panel. By clicking the orange "View Player Dashboards or Inventories" button, you will open a modal listing all your players as cards. From here you can click a player name to go to their dashboard, or click the blue "Player Inventory" button to view that player's inventory.
9.1 Inventory Containers
Containers help organize your items within an inventory or shop.
Adding a Container
To add a container, click the green "New Container" button at the top of any inventory or shop. Give it a name and select an image to use as the icon. Entering a number in the order box denotes how the containers will display within the inventory. If you are a GM, you can make a container secret, which will hide it from players (even if it is within their player inventory). Click the blue "Create Container" button when you are done.
Editing a Container
To edit a container, click the small green "Edit Container" button to the far right of the container title on the inventory page.
Adding Items to Containers
There is a small green "Add Item" button to the far right of the container title on the inventory pages. You can also select the container in the Container dropdown on the item form. Using the "Add Item" button next to the container will automatically fill the dropdown for you.
Transfer a Container
You can also move an entire container of items at once by clicking the small orange "Transfer" button in the top bar of the corresponding container. This allows you to quickly move a set of items all together to another player or shop, etc.
9.2 Inventory Items
There are a lot of options for item tracking. Add items that you loot during your campaign, edit them with new details as you inspect them further. You can also use, sell and transfer items as needed. We go more in depth for each option below.
Adding an Item
See section: Adding an Item
Editing an Item
To edit an item, click the small green "Edit" button on an item card. If you have the item details modal open, there will be a small green "Edit Item" button in the upper right. Click the blue "Update Inventory Item" at the bottom, when finished. For more information on the form options available, see Adding an Item, above.
Need to change an item detail quickly? Click the item image to open the item details modal and go to the Quick Edit tab. Quickly change the quantity, value, tags, weight, value or container of an item here. Click the orange "Update Inventory Item" to finish.
View Item Details
See section: View Item Details
Use, Sell, or Transfer Item
See section: Use, Sell, Transfer Items
Delete an Item
To delete an item, click on the image in the item card to open the view modal. Then click the small red "Delete Item" button in the upper right. You can also delete an item from the edit screen by using the red "Delete Item" button in the bottom left.
9.2.1 Adding an Item
Add an item using the green "Add Item" button at the top of any inventory or shop. You can also add an item directly into a container by using the "Add Item" button next to that container.
On the Add Item screen, you have two options at the top represented by tabs. You can create a new item from scratch using the "New Item" tab, or click the other tab labeled "Copy Item" to copy an item from your Item Library.
Adding an Item with the Form
We offer a multitude of fields for item tracking. Enter an item name, quantity, value, weight, and description. Track as much or little data as you need for your style of play. Note: Currencies must be set up in order for the value fields to be visible. If you are a Game Master, you will see an additional text box under description for Game Master Secrets.
You can also select a container for the item from the dropdown. For more information on containers, see: Inventory Containers.
The Item Tags checkboxes are used to label items for various circumstances such as "Consumable" or "Quest". These labels appear on the item cards to help you visualize what items are for more quickly.
The last section of the form is where you can add an image to your item. If you are on a Knight, Monarch, or Deity tier, you have access to our Image Library. The image library has a large selection of high quality images you can choose for your items to make your inventory look amazing! We keep a preview video of our image library on this page, but please note it does not always contain the most updated selection: Image Library Preview
Copy Item from Item Library
If you are copying an item from your item library, you can click the small orange "Quick-copy" button on one of the item cards to make an exact duplicate with a quantity of one. You can also click the item image to open the details modal to read the description. With the details modal open, go to the Copy Item tab and use the Quantity and Inventory dropdowns to transfer a custom quantity to the selected inventory.
Quick-add Multiple Items
Another option at the top of your inventory pages is a green button labeled "Quick-add Multiple Items". This opens a condensed form that allows you to record up to five items at once. This is useful if the GM is reading loot quickly, and you want to add items to identify later. The condensed quick-add form allows you to set a quantity, name, and description. Any fields with the name left blank will be ignored.
9.2.2 View Item Details
Click the small blue "View Item" button on your item card to view the item details in a pop-up modal. You can also click the item image for the same effect. The details modal displays the image, name, quantity, value and weight of the item in the top bar. You may also see some buttons in this top area on the upper right. These buttons allow you to delete the item, clone it to your item library, or edit the item.
Below this top bar you will find a set of tabs. The first tab contains the item description. If you are a GM, the next tab contains any Game Master secrets you have for the item. The remaining tabs allow you to use, sell, transfer, or quick-edit the item. Those tabs are detailed further in the other sub-sections of this guide.
9.2.3 Use, Sell, Transfer Items
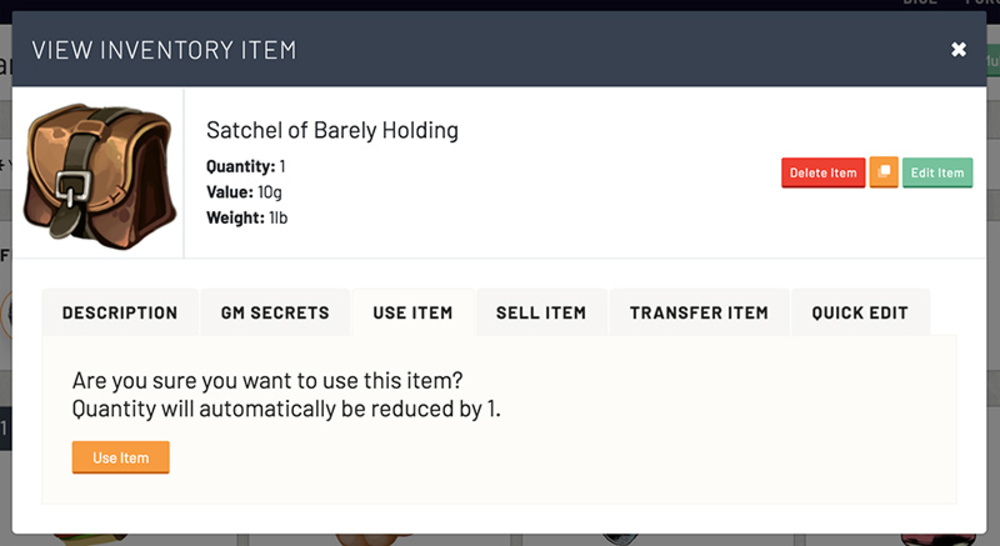
Click an item image, or the small blue "View Item" button on the item card to bring up the item details modal. This will give you the following options separated into tabs:
Use Item
If you are using a consumable, or similar, select the Use Item tab in the item modal. Click the orange "Use Item" button to automatically remove one from the item quantity. When an item quantity goes down to 0, the item will remain in your inventory but will not be sellable or usable. That way, if you acquire more, you can simply edit the item to change the quantity instead of re-creating the item from scratch.
Sell Item
To sell an item from your inventory, open the item details modal and select the Sell Item tab. The currency boxes will automatically fill with the value for the item (if a value is set). You can change the quantity dropdown, and the boxes will automatically update the values again with the (value x quantity). You also have the option to edit the boxes yourself to change the total sell price. Click the orange "Sell Item" button to complete the sale. The item quantity will be removed from your inventory and the funds will be added to your wealth. If you are selling an item from the party inventory, funds will be added to the party wealth instead.
Transfer Item
To transfer an item, open the item details modal and select the Transfer Item tab. If you are a Game Master, your "Transfer to Inventory" dropdown will contain all player inventories, the party inventory, shops, and encounters. GM's can move items anywhere around the campaign. If you are a player, you will be able to transfer items to other players, the party inventory, and any shops that you own. Select a quantity you wish to transfer from the dropdown and then click the orange "Transfer Item" button to complete.


